With all the zombie movies and shows
that have been building in popularity.
Zombies seem to big the big hit for
Halloween this year. Especially with the
bigger kids and adults. So I am going to
share a super cheap and easy way to
make zombie flesh.
that have been building in popularity.
Zombies seem to big the big hit for
Halloween this year. Especially with the
bigger kids and adults. So I am going to
share a super cheap and easy way to
make zombie flesh.
Step 1. Use a glue stick and put glue
where you are going to want the rotten
flesh. **don't worry about it getting
stuck. it washes off with soap and
water**
where you are going to want the rotten
flesh. **don't worry about it getting
stuck. it washes off with soap and
water**
Step 2. Place one ply toilet tissue on the
glue. it will stick in place as soon as it
touches and it's ok if its wrinkly.
wrinkles help the effect.
glue. it will stick in place as soon as it
touches and it's ok if its wrinkly.
wrinkles help the effect.
Step 3. Tear off excess and fold down
edges to add some thickness to the
outlining.
edges to add some thickness to the
outlining.
Step 4. I used my black onyx eyeliner to
outline the flesh and added a vainy look.
outline the flesh and added a vainy look.
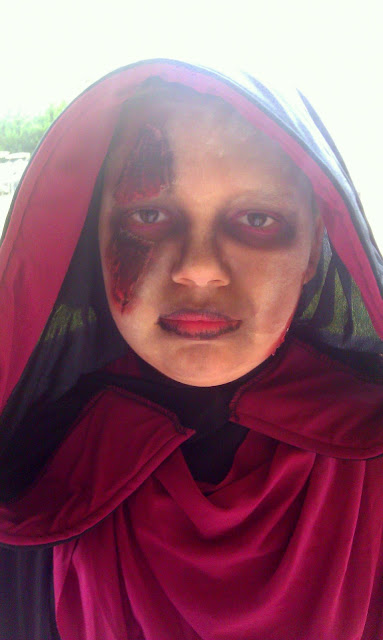
Step 5. Next I used a red lip liner to add a deep dark blood look.
Step 6. I also used a blush brush and
charcoal black eye shadow to enhance
the rotten look. you'll mainly just want
to use it around the edges of the toilet
paper.
charcoal black eye shadow to enhance
the rotten look. you'll mainly just want
to use it around the edges of the toilet
paper.
Step 7. Lastly you'll want to add your
blood :) you can never have enough
blood!! I use a sponge to dab it on then it
let it drip down the side.
blood :) you can never have enough
blood!! I use a sponge to dab it on then it
let it drip down the side.
And here's my little Zombie!!


14 comments:
That is so cool I would have never thought to do that.
That is so clever! We live in Australia and Halloween isn't as big as in the US (yet I might add, cause it seems to get bigger by the year).
This is so cool! I'm so glad to be following you, your blog is great:)
Katie
www.funhomethings.com
That is great! I Hesitate on the glue on the face!?! Is that safe?
Very cool - Joining from Inspire Me Monday - http://allthoseartsygirls.blogspot.com/
Thanks you very much!! That's so nice of you to say :)
That is really neat. It seemed to turn out really well. If only I owned makeup haha!
Stopping by from the GFC Blog Hop,
Tasha
http://frozenojsconcentratedlife.blogspot.com/
I had never thought about the glue stick I was using as possibly being a hazard. But you got me thinking so I looked up the M.S.D.S sheet for the glue stick. http://www.elmers.com/msds/me513_b.htm I use the Elmers Disappearing Purple School Glue Sticks. IT's says it's non-toxic and acid free. The only says for skin that "May cause irritation on prolonged or repeated contact". We haven't had any kind of reaction from it and no itching or rash but I wouldn't recommend it for anyone with sensitive skin. I'm so glad you brought that up tho.
Thanks for being a follower!! I'm following your blog now too :)
Thanks Ann :)
Oh wowed gross! Amazing work! I'm featuring you -- you're a STAR over at I Gotta Create!
Thank you for linking up at the Wildly Original party
<3 Christina at I Gotta Create!
Wow, that's really original and it looks really good! Perfect for Halloween indeed!
xoxo Grace
Awww how wonderful and THANK YOU SO MUCH!!
That is hilarious, albeit creepy! Great tutorial!
Post a Comment
Thank you so much for stopping by my blog or following along with my journey. I genuinely hope you enjoy my posts and can possibly find some of them helpful. If you have any questions or comments please feel free to post them or email me. :)